Creating web service with Apache Aixs2 is the easiest thing you will ever find (trust me). Following are the steps to create a simple web service with Apache Axis2
Step 1: Download Apache Axis2
You can download Apache Axis2 from here. I am using version 1.5.6 binary distribution zip file, you can use any latest version. Download zip file and unzip it to any suitable location on local drive.
Step 2: Configure Apache Axis2 in Eclipse
I am using Eclipse Galileo (Build id: 20090920-1017 to be specific) you are free to use any other preferable version of Eclipse. Now it time to open your IDE and configure Apache Axis2. Go to

otherwise you will following get error message
Step 3 : Create new dynamic web project
Now create a new dynamic web project in Eclipse. Give any name to it. Create a new package inside it. Now we will write our web service inside this package. (You can use default package but it good thing to avoid use of default package). Now create a new class inside it. Here is my dynamic web project.

Step 4: Write a web service
First we will write a simple method inside our class and then will convert it into a web service. Lets start with a simple method which accepts a name and returns a greetings string. I have written following method inside my Greetings class. Here is my code

You will see following screen after selecting Create Web service option

Select your server I am using Tomcat 6.0. Now hit Finish.
It will ask you for services.xml, use default file and dont worry about it. Next you will be asked to start server just follow it.
Step 5: Test your web service
Right click on your project and elect Run as -> Run on server option, select your server. It will open up following screen
 Click on services,you will see your class name under Available services title. It means you have successfully created your web service.
Step 6: Access your web service
Congratulations you have successfully created a web service. You can access it using following URL syntax

This is a really basic example. You must explore basic web service concepts / terminologies before working with web services. Because creating a web servie is a really simple thing but understanding concepts behind it is going to be a difficult one (I am still struggling with concepts)
Hope it helps.
~Ajinkya.
Step 1: Download Apache Axis2
You can download Apache Axis2 from here. I am using version 1.5.6 binary distribution zip file, you can use any latest version. Download zip file and unzip it to any suitable location on local drive.
Step 2: Configure Apache Axis2 in Eclipse
I am using Eclipse Galileo (Build id: 20090920-1017 to be specific) you are free to use any other preferable version of Eclipse. Now it time to open your IDE and configure Apache Axis2. Go to
Window -> Preferences -> Web services -> Axis2 Preferences -> Axis2 Runtime taband click on browse now select the unziped Apache Axis2 file . If you have downloaded binary distribution file you may need to select axis2-1.5.6 folder which is present inside axis2-1.5.6-bin folder. (Version name at the end of folder name will vary depending on which version you have downloaded). If everything went fine you will see following message
Axis2 runtime loaded successfully
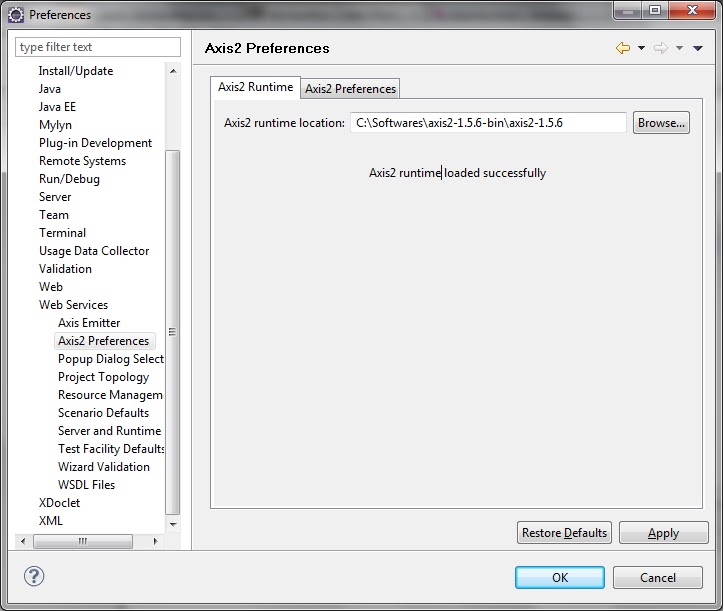
otherwise you will following get error message
Error occurred while loading Axis2 runtime. Select the correct Axis2 runtime folder.Just make sure you are selecting the right version. If you did this successfully, Congratulations !!!
Step 3 : Create new dynamic web project
Now create a new dynamic web project in Eclipse. Give any name to it. Create a new package inside it. Now we will write our web service inside this package. (You can use default package but it good thing to avoid use of default package). Now create a new class inside it. Here is my dynamic web project.

Step 4: Write a web service
First we will write a simple method inside our class and then will convert it into a web service. Lets start with a simple method which accepts a name and returns a greetings string. I have written following method inside my Greetings class. Here is my code
package com.ajinkyaparakh.ws;

public class Greetings {

 public String sayHello(String name) {
  return "Hello " + name + ". Have great day !";
 }
}
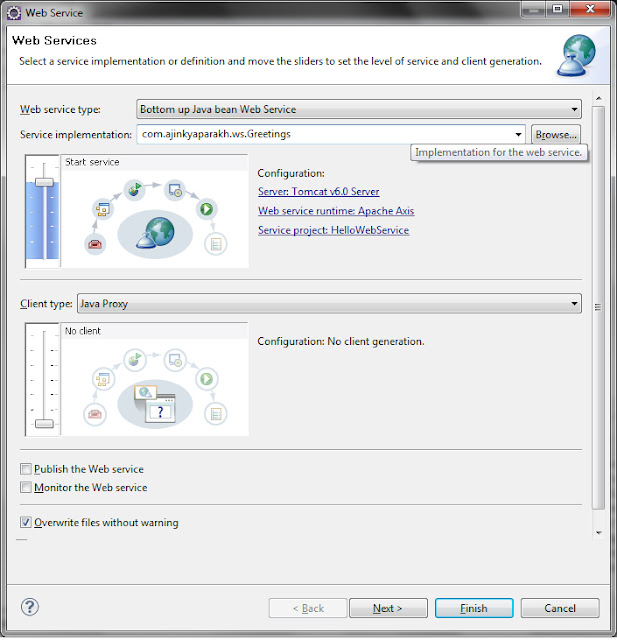
Now right click on your class and select Web Services -> Create Web service option
You will see following screen after selecting Create Web service option

Important: Change Web service runtime option to Apache Axis2. Default is Apache Axis.This is the most important step while creating web service with Apache Axis2 otherwise you will spend hours playing with different unexpected and surprising errors. :)

Select your server I am using Tomcat 6.0. Now hit Finish.
It will ask you for services.xml, use default file and dont worry about it. Next you will be asked to start server just follow it.
Step 5: Test your web service
Right click on your project and elect Run as -> Run on server option, select your server. It will open up following screen

Step 6: Access your web service
Congratulations you have successfully created a web service. You can access it using following URL syntax
http:// localhost:port/ProjectName/services/ClassName/MethodName?arument=valueFor this tutorial it will be
http://localhost:8080/HelloWebService/services/Greetings/sayHello?name=AjinkyaYou will see following response

This is a really basic example. You must explore basic web service concepts / terminologies before working with web services. Because creating a web servie is a really simple thing but understanding concepts behind it is going to be a difficult one (I am still struggling with concepts)
Hope it helps.
~Ajinkya.
Congrats... :)
ReplyDeletegreat work... I really cant believe that this is done by Ajinkya whom I knew in the college.... ;)
But its really great.....
fantastic !!! Ajinkya
ReplyDeletevery easy and good step by step explanation